wsl --install
sudo apt update
sudo apt -y install fastqc
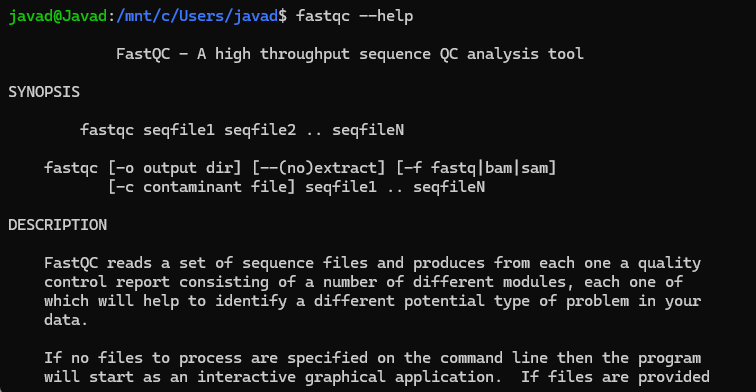
fastqc--help
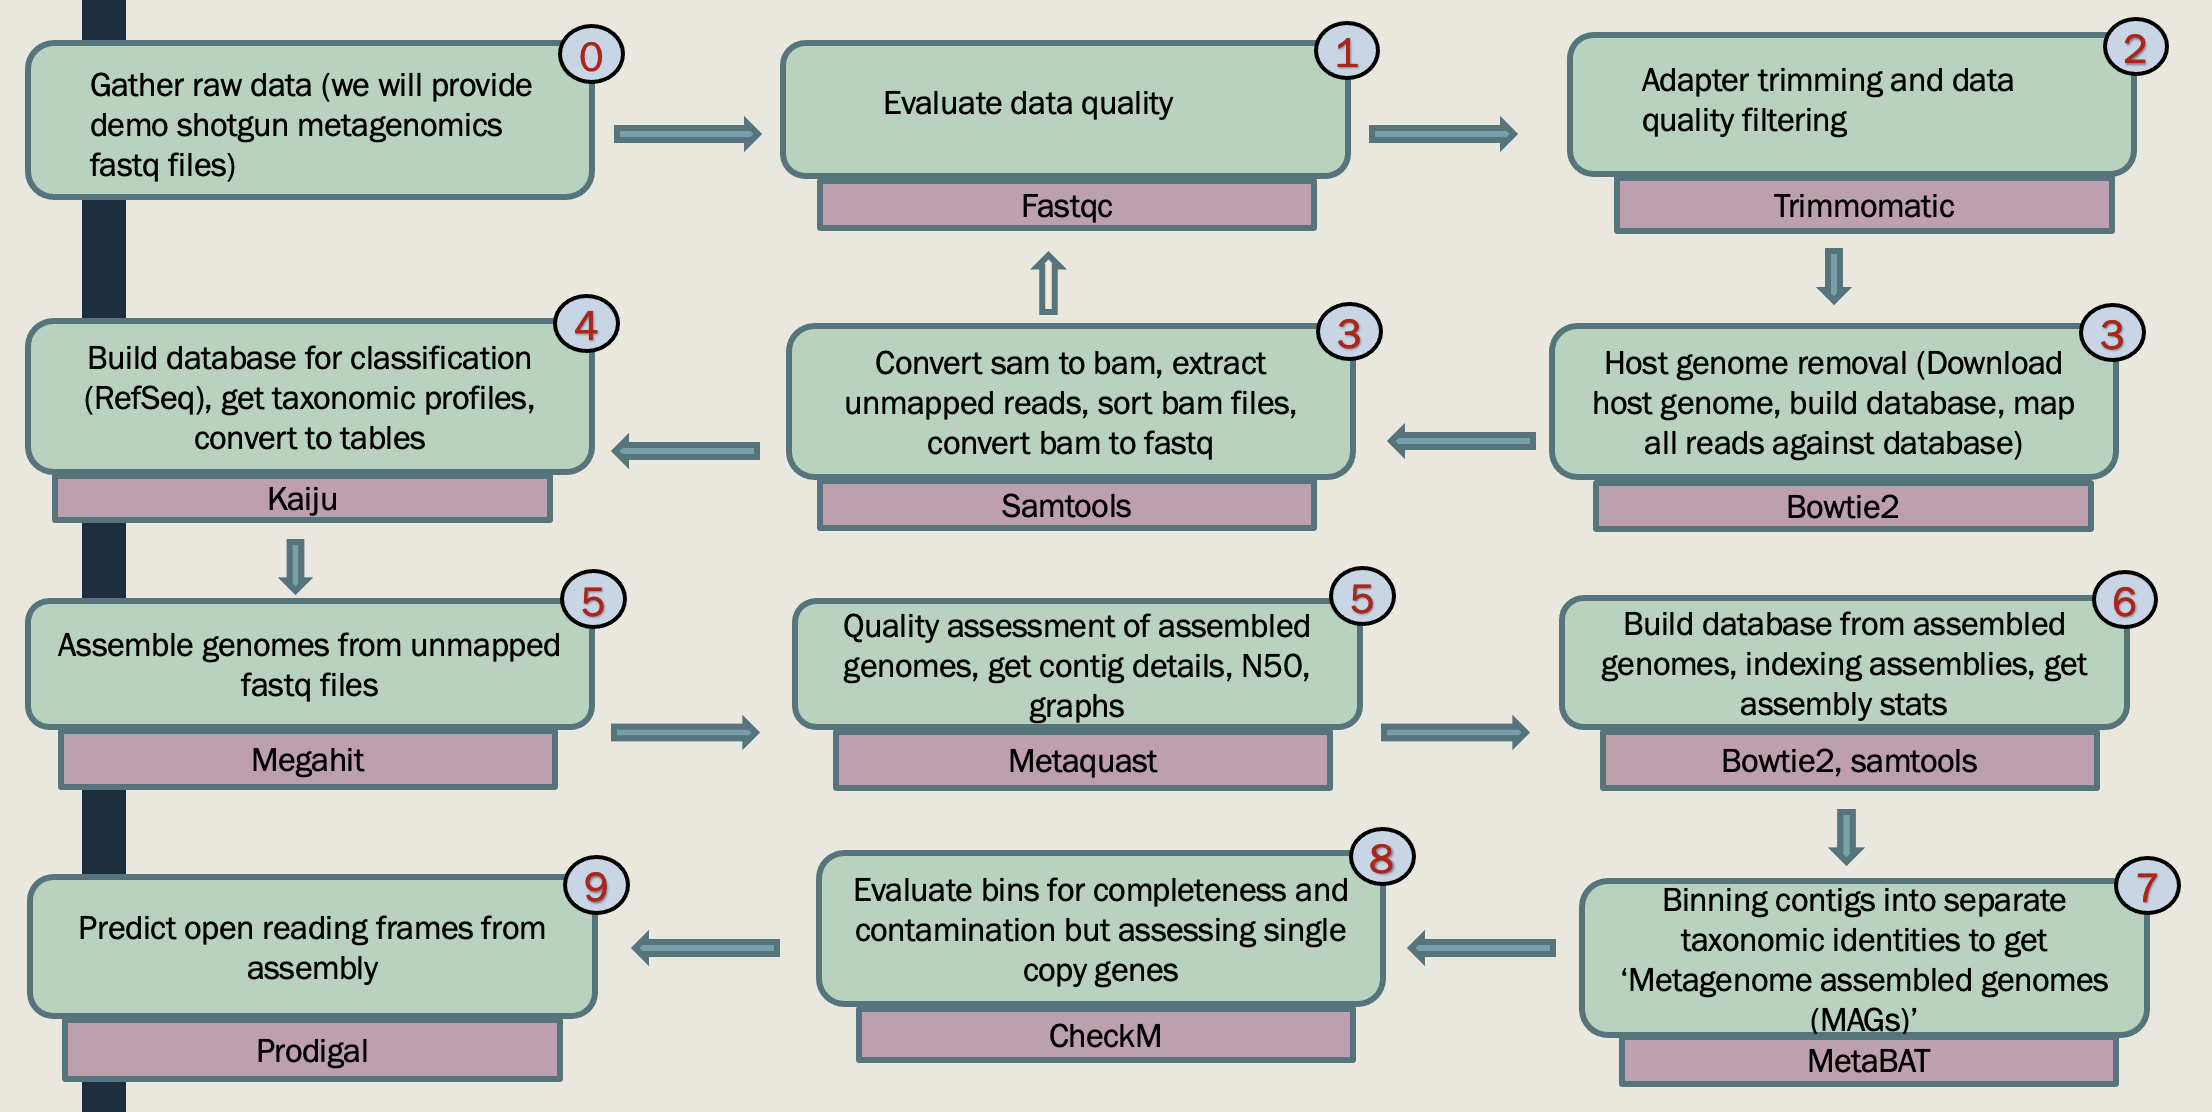
This genome-centric metagenomics workshop will teach you how to obtain provisional whole genomes of individual populations from a mixed microbial community using metagenomics. The workshop has three parts:
Part I: Participants will learn to install required software, check raw sequence read quality, perform read quality control, and trim their sequence data. Participants will also learn how to upload and dowload sequence files from online archive databases.
Part II: In this part you learn how to assemble and annotate contigs, bin contigs into provisional whole genome sequences.
Part III: Participants will learn to how to extract taxonomic information, functional annotations, and pathway information for each binned genomes.
Workshop Topic Highlights
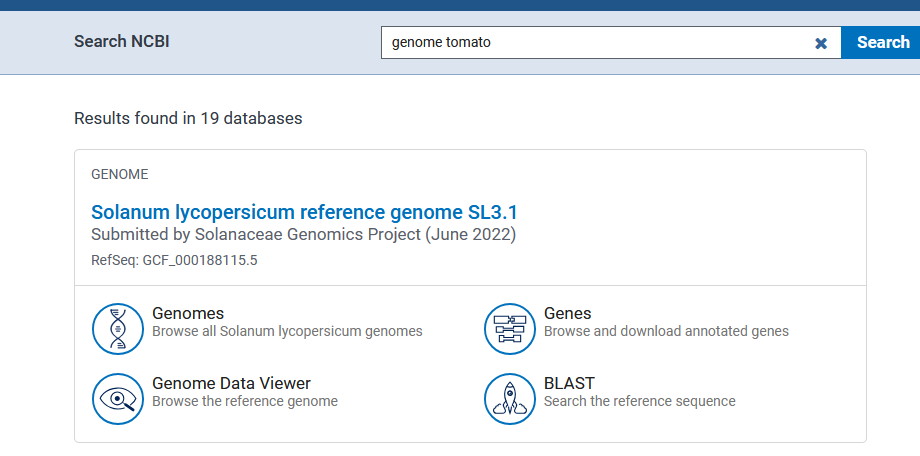
You can either bring your sequence of intrest or dowload the sequence from online resources. One of the most useful online resources to download archive sequence files is using NCBI SRA. To do so:
sudo apt install sra-toolkit
prefetch SRR29754043
fastq-dump --split-files SRR29754043 -O your/output/file
cd SRR29754043
cd your/output/folder
fastqc *fastq -O SRA_fastq
There are a variety of software for Trimming (e.g, removing adapter). Adapter sequences should be removed from reads because they interfere with downstream analyses, such as alignment of reads to a reference. SRA include few changes to the sequnce files, that are not compatible with some of the analysis. That is why we are going to use these sequences throughtout the workshop. However, for triming you can use your SRA sequences for pratice.
It works with FASTQ (using phred + 33 or phred + 64 quality scores, depending on the Illumina pipeline used), either uncompressed or gzipp'ed FASTQ. Use of gzip format is determined based on the .gz extension.
For single-ended data, one input and one output file are specified, plus the processing steps. For paired-end data, two input files are specified, and 4 output files, 2 for the 'paired' output where both reads survived the processing, and 2 for corresponding 'unpaired' output where a read survived, but the partner read did not.
grep AGATGTGTATAAGAGACAG SRR29754043_2.fastq
java -jar trimmomatic-0.39.jar PE S28_R1.gz S28_R2.gz output_forward_paired.fq.gz output_forward_unpaired.fq.gz output_reverse_paired.fq.gz output_reverse_unpaired.fq.gz ILLUMINACLIP:NexteraPE-PE.fa:2:30:10:2:True LEADING:3 TRAILING:3 MINLEN:36
conda install -c bioconda bowtie2
sudo apt update
sudo apt install bowtie2
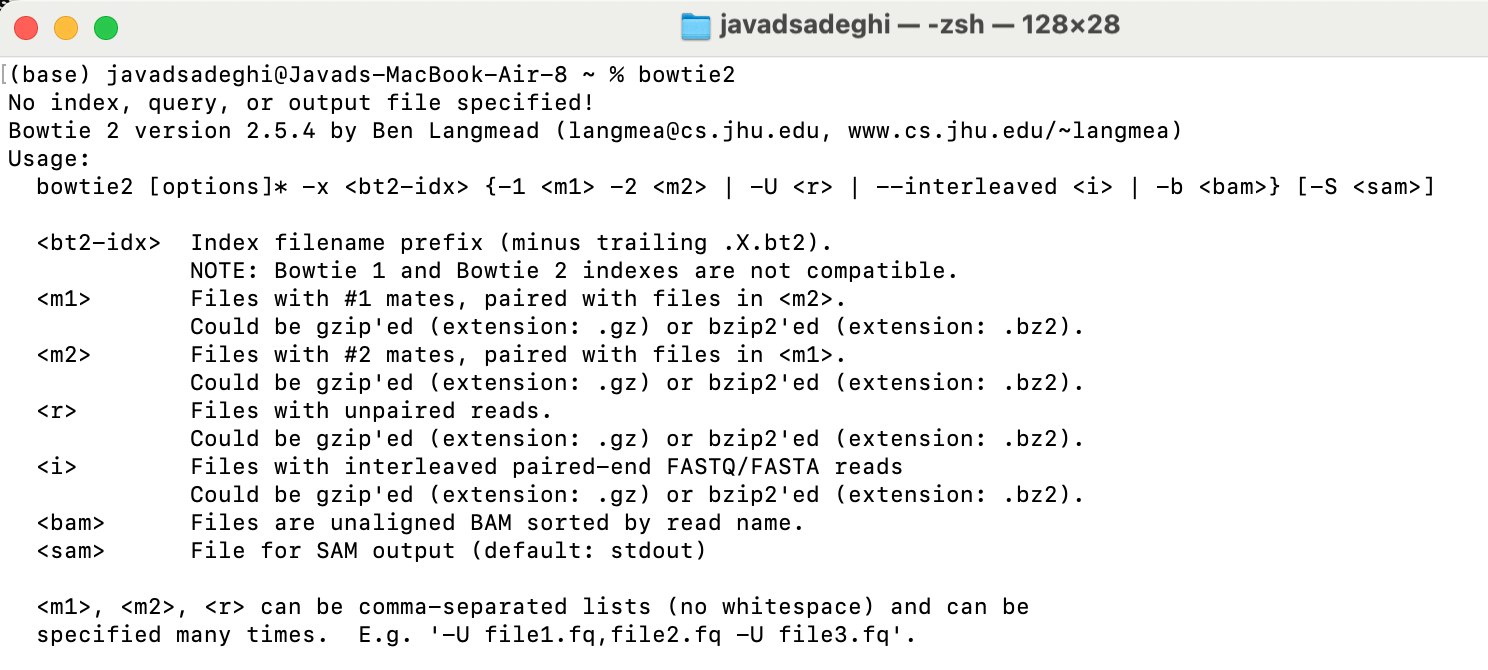
bowtie2 --help
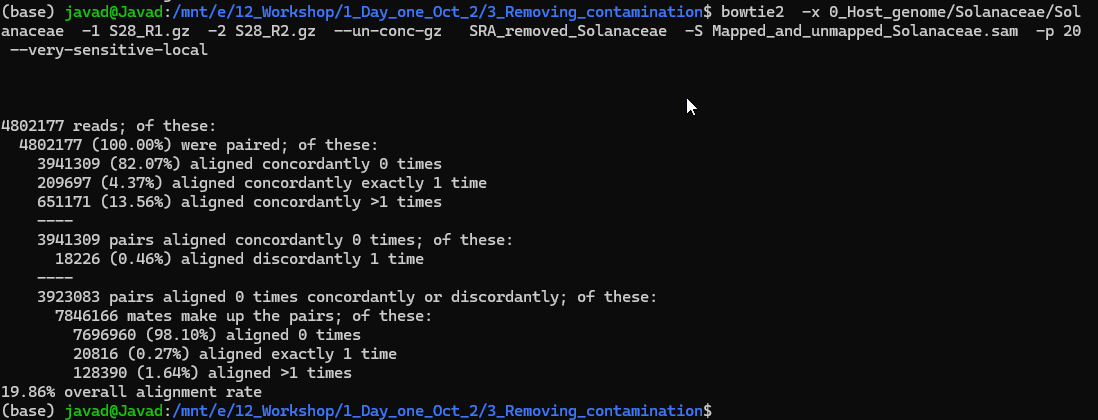
Sometimes we have host DNA and we need to remove the host DNA before doing any downstream analysis. For example, if I am looking at mice gut microbiome, I do not need mice DNA, however, during the DNA extractions some of the mice gut intestinal epithelial DNA will be sequnece as well. To remove that we are going to use Bowtie2. Bowtie2 is a refrence base alinement and has huge application in RNA and WG sequencing. To remove host DNA run below code. We will follow the instruction provided here:
https://www.metagenomics.wiki/tools/short-read/remove-host-sequences
Useful links:
Building refrence (e.g, Multilple E.coli): https://www.metagenomics.wiki/tools/bowtie2/index
https://open.bioqueue.org/home/knowledge/showKnowledge/sig/bowtie2
Archives indexes: https://bowtie-bio.sourceforge.net/bowtie2/news.shtml
bowtie2 -x 0_Host_genome/Solanaceae/Solanaceae -1 S28_R1.gz -2 S28_R2.gz --un-conc-gz S28_removed_Solanaceae -S Mapped_and_unmapped_Solanaceae.sam -p 20 --very-sensitive-local
bowtie2-build Solanaceae.fna Solanaceae --threads 20
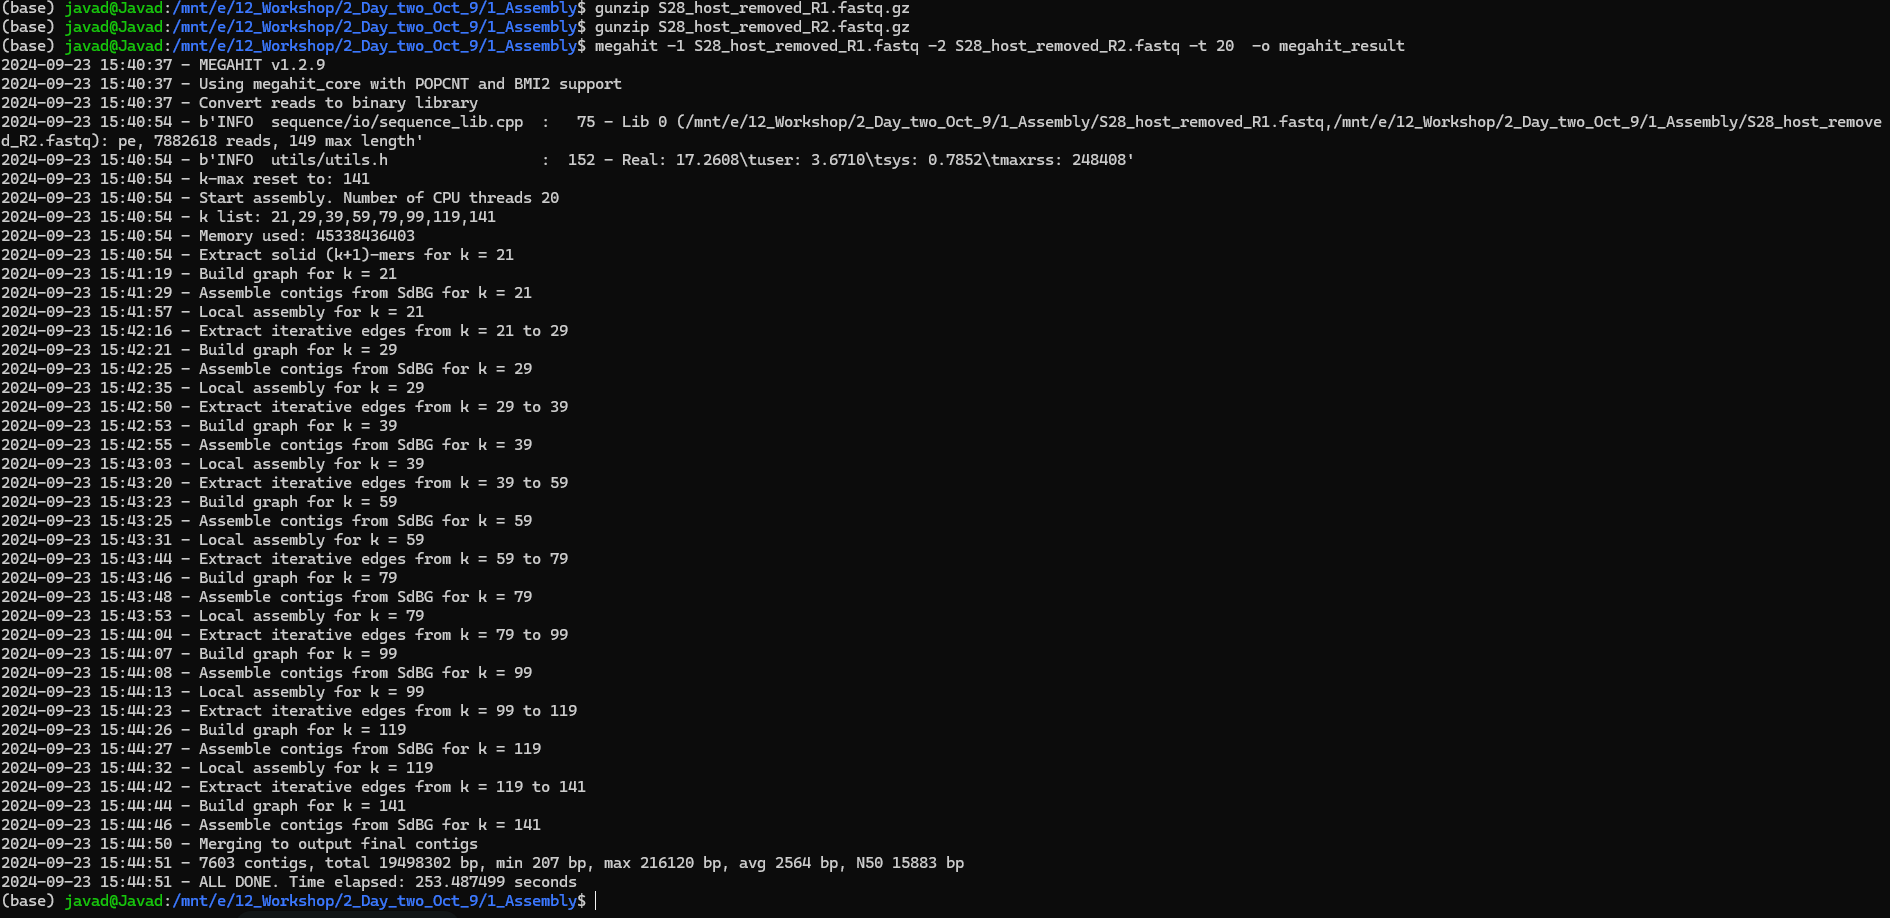
To run MEGAHIT:
Input: metagenomics sample as paired-end fastq files _R1 and _R2
Important: Make sure your files are fastq files (You can use gunzip to unzip your files in terminal)!
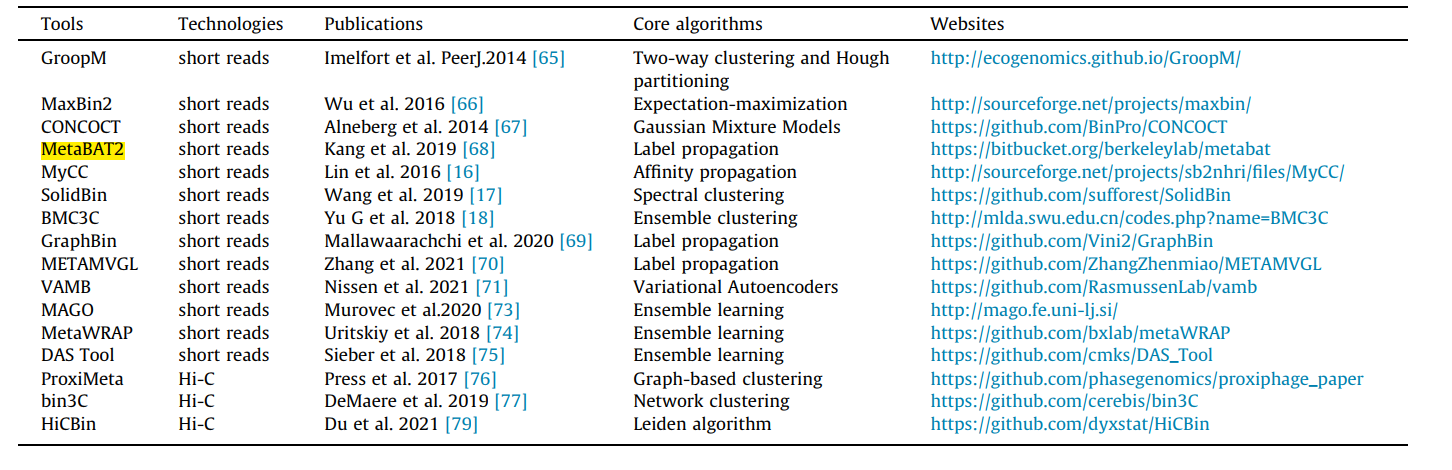
The esiest way to do this is to use galaxy MetaBAT2! To do so use your final_contigs_file from megahit and upload it at: https://usegalaxy.eu/?tool_id=toolshed.g2.bx.psu.edu/repos/iuc/metabat2/metabat2/2.15+galaxy1
More info:https://bitbucket.org/berkeleylab/metabat/src/master/
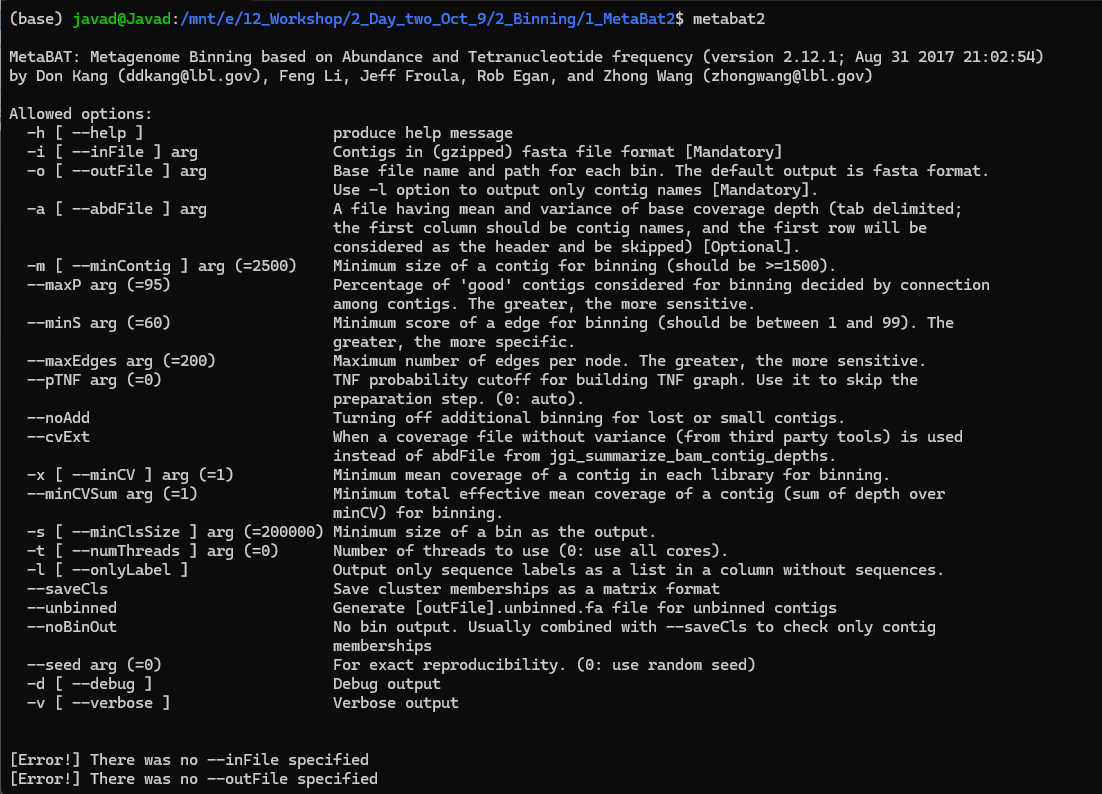
Or install MetaBAT2 using conda on Linux:
Put these three files in one folder:
final.contigs: from megahit
S28_sorted.bai (from day 1 output from bowtie)
S28_sorted.bam (from day 1 output from bowtie)
The above code will generate a fill named depth. After generating this file, run the second code:
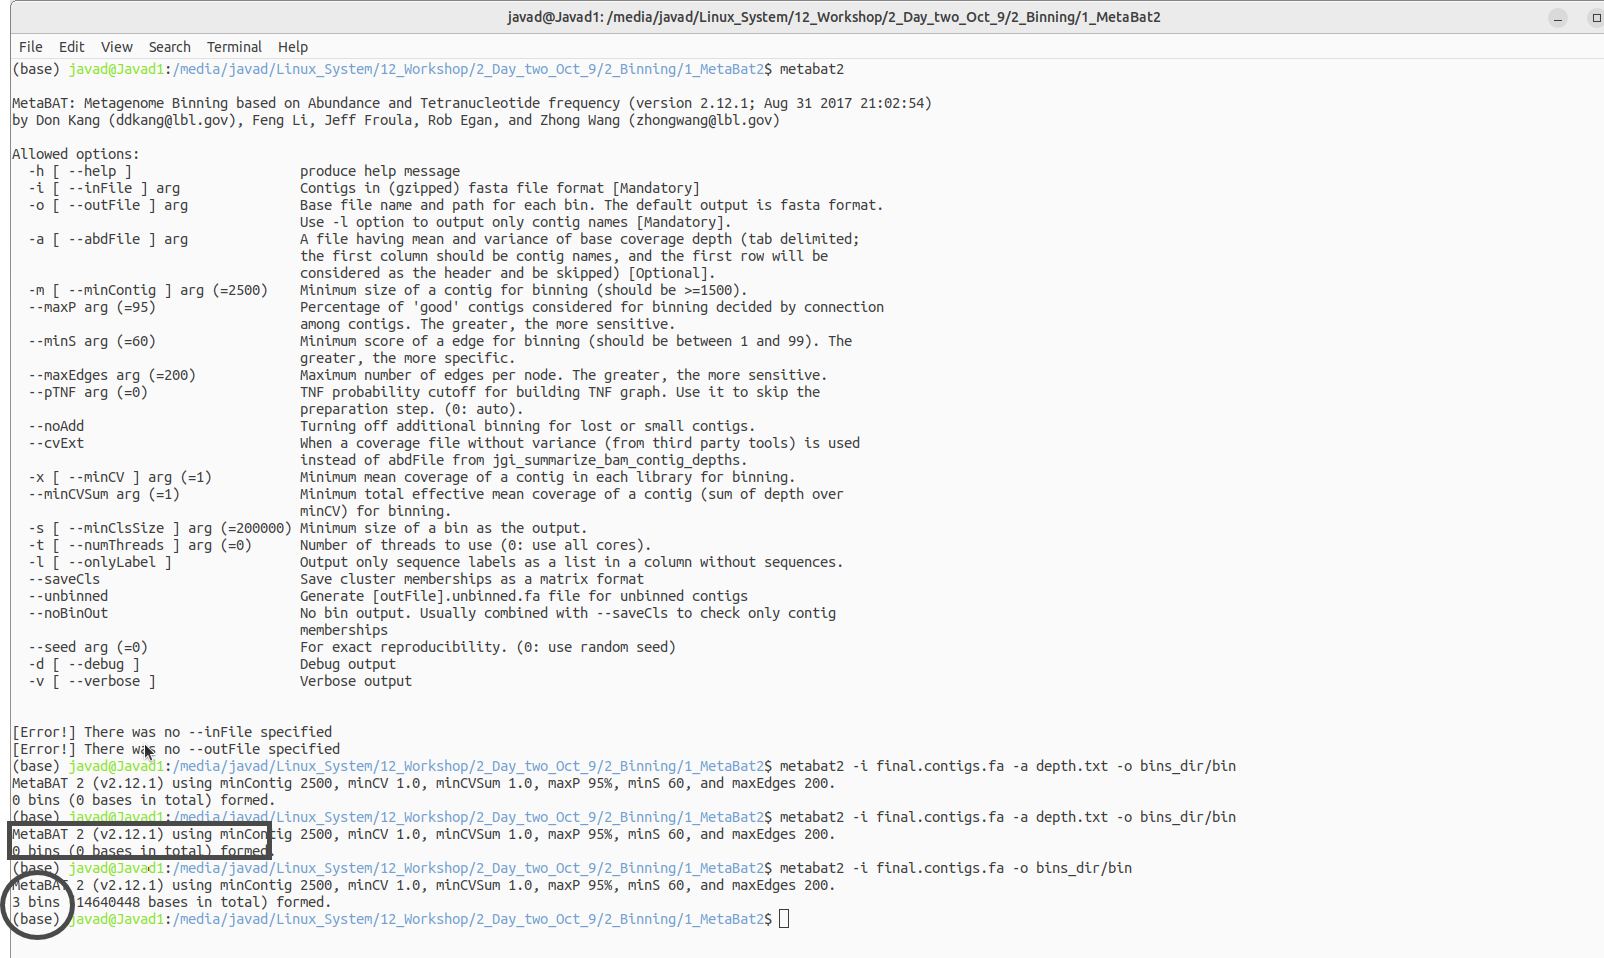
WSL due to memory issues cannot run this code thus I have to use Linux for this!
Here is the code in Linux!

mv S1_removed_Solanaceae.1 S1_host_removed_R1.fastq
mv S1_removed_Solanaceae.2 S1_host_removed_R2.fastq
samtools index S28_sorted.bam S28_sorted.bai
samtools sort S28_mapped_and_unmapped.bam -o S28_sorted.bam
megahit -1 SAMPLE_R1.fastq -2 SAMPLE_R2.fastq -t 20 -o megahit_result
conda install bioconda::megahit
jgi_summarize_bam_contig_depths --outputDepth depth.txt *.bam
metabat2 -i final.contigs.fa -a depth.txt -o bins_dir/bin

brew --help
brew install bowtie2
bowtie2

conda --version
conda install bioconda::megahit
conda --version
conda install bioconda/label/cf201901::metabat2
samtools view -bS Mapped_and_unmapped_Solanaceae.sam > S28_mapped_and_unmapped.bam
conda install bioconda::samtools
conda install bioconda/label/cf201901::samtools
0_Data:
https://www.dropbox.com/scl/fo/xt23fj53v9eg8m9okvndy/AMkpQFhb6eOJ9B7_puzSfwA?rlkey=rxr6o5tn3um4b2d65stnc20et&st=53uzp1kn&dl=0
1_fastqc_results:
https://www.dropbox.com/scl/fo/deksjix5tt1ssoz5r446v/AM0Ta4zs-1iSq5GJ-grwJPo?rlkey=wo66gzt9jhvlwnwdr3xcmjsz1&st=i9tizve0&dl=0
2_Trimmomatic_removed_adaptor:
https://www.dropbox.com/scl/fo/mdxvi95c41knyry5na04l/ANGW2yk_xpwk57a3hD8qUgA?rlkey=kioqgrcqm2lsxmr3ugmyz9x7i&st=wf64wbfd&dl=0
3_Bowtie:
https://www.dropbox.com/scl/fo/a2b8noinc0sr6oa6icpdh/ALYTu_iOqg-tDekTwivWBqI?rlkey=5ekzstecfa2esawsrq5salejv&st=lb9vr5gd&dl=0
4_Sam_tools:
https://www.dropbox.com/scl/fo/clme5na8x92ao2jjlaw2p/AKgQFiO2jsJVqhS4H8oCkHg?rlkey=pely4stzvx564pe65urkkv7zx&st=atzc8brm&dl=0
5_Assembly_megahit:
https://www.dropbox.com/scl/fo/dtr14z6ijzcbndwcwum0t/AN3WiJh1lSAfGqXBROQSU6s?rlkey=jjdvfl8q5hd2xr6tsu50vofor&st=kmjuoju3&dl=0
6_Binning:
https://www.dropbox.com/scl/fo/s1fpvta4te3r85l9uffho/AJvHs-EV8diNP78dKqJpe3c?rlkey=o2b0ew12nuymln2wons5ymrt0&st=ubcgg97h&dl=0
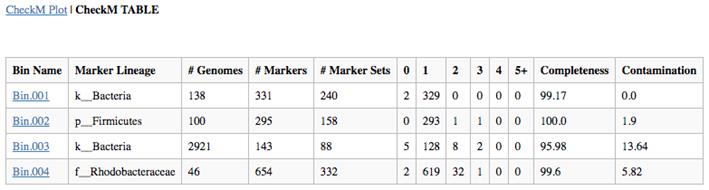
7-CheckM
https://www.dropbox.com/scl/fo/c18a3277lmak0p0fdklet/AH7N4k4P6rrkQaADwFXMgJ4?rlkey=tbato504aw7byh56udg8lmo2h&st=fe3nyyzq&dl=0
8_Gene_Prediction
https://www.dropbox.com/scl/fo/j14zw3pynhehfsd0yvxy8/ABeOY9F5Fh8-g0GxYBR2RtI?rlkey=958zv9jeeyn7cqsnq4gfrxbf0&st=cimhhnd5&dl=0
9_Funtional_anotation_prokka
https://www.dropbox.com/scl/fo/szjbdlxu89y60o6hvu8xi/ANwCrYDtJ5KCjP_4sVj5ENM?rlkey=x9x2g5umixb57ysf0bzx9eywc&st=89xwi6nb&dl=0
11_Quantify_genes
https://www.dropbox.com/scl/fo/5mytb3ra1vbino9etnwzt/AHecX_-rQvNjrL3_xcDg7so?rlkey=4hk7szw33cm6vzead1opwflkv&st=cg0u405g&dl=0

brew install brewsci/bio/prokka
conda install -c conda-forge -c bioconda -c defaults prokka
brew install hmmer
brew install prodigal
brew install pplacer
pip3 install numpy
pip3 install matplotlib
pip3 install pysam
pip3 install checkm-genome
Also download the reference file and put it into your path
https://zenodo.org/records/7401545#.Y44ymHbMJD8
conda create -n checkm python=3.9
conda activate checkm
conda install -c bioconda numpy matplotlib pysam
conda install -c bioconda hmmer prodigal pplacer
pip3 install checkm-genome
Also download the reference file and put it into your path (export CHECKM_DATA_PATH=/path/to/my_checkm_data)
https://zenodo.org/records/7401545#.Y44ymHbMJD8
pip install HTSeq
pip install HTSeq
checkm lineage_wf -x fa bins_dir/ METAG_checkm/ --threads 16 -f METAG-checkm.tsv --tab_table
prodigal -i my.metagenome.fna -o my.genes -a my.proteins.faa -p meta
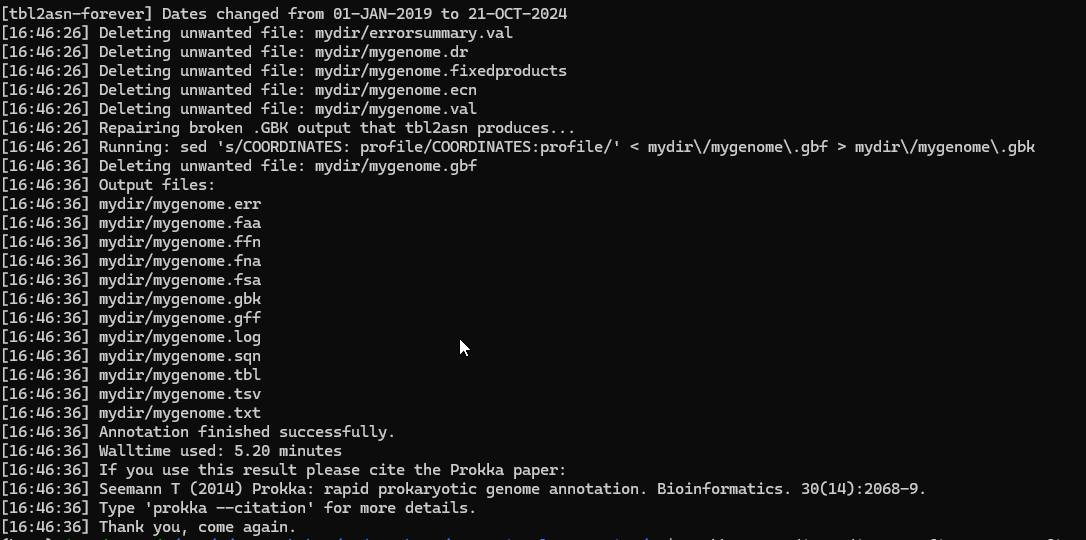
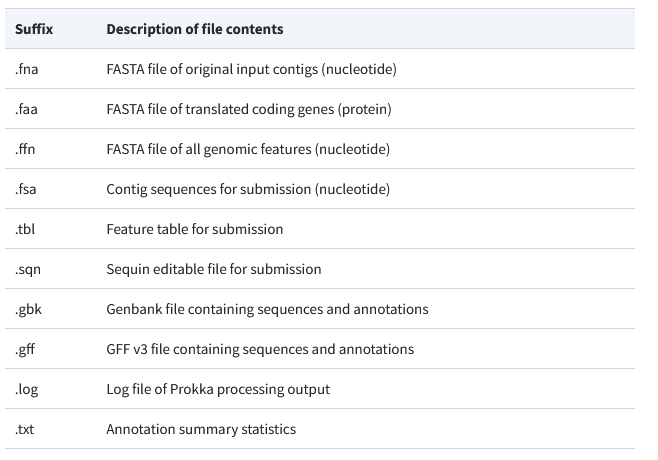
prokka --outdir mydir --prefix mygenome final.contigs13.fa
htseq-count -r pos -t CDS -f bam S13.map.sorted.bam S13.gft > S13.count